Aug
24
After acquiring Skype Microsoft continues to integrate Skype with existing infrastructure.
Now Skype updates are available from Microsoft update service in addition to previous Skype update (Help -> Check for updates).

Skype now also on Windows update
What is new in version 5.10:
- Voice and video calling your Facebook friends from Skype
- Finding your Facebook contacts more easily and faster with the new contacts lists
- Tagging the contacts you talk to most often as Favorites
- Possibility to control Skype video rendering technology for backward compatibility for people who have trouble with video calls
- And of course New update method…
For more information Microsoft KB article 2727727 and Skype Blog post.
Sep
20
Windows 8 – First updates
Filed Under Windows | Leave a Comment
After initial installation I started to measure performance.
One really good tool for the job is windows experience index.
Initially my system had overall index of 2.1:

Then I checked for updates. Fortunately there were some from Microsoft. Here is the result after updates:

As you can see my index jumped to 2.3 and my graphics performance increased to from 2.7 to 3.0.
Encouraged by this I’ve installed latest video driver from NVIDIA (for Windows 7):

The results since positive My index increased to 2.4 were not so drastic, but still an improvement. Probably this is because my card is relatively old and slow or just because NVIDIA does not have(yet) drivers tuned specifically for Windows 8…
Only time will tell 😉
Stay tuned.
Sep
17
I had Windows 8 installed on my old AMD 64 with 2G RAM.
Installation went smoothly and it was really quick (did not time it, but it is faster than XP installation) with 2 reboots required.
Almost all Hardware was recognized and functional – it looks like my integrated card reader give some trouble… but will work on it.
What I had to probably start with is that the license for that system is valid until March 8, 2012 (Is it a coincidence that this is international women day 😉 ).
And most importantly you have to plan that installation really carefully.
If you need to (witch is most probably the case) keep your old OS (XP/W7) you need to:
- Create new partition for Windows 8 – this can be done with live CD like partedmagic or similar tool (windows disk management).
- Choose that partition as destination during windows 8 install – you need to choose Custom as install method.
- Continue installation
- After installed go to system properties -> advanced -> startup and recovery settings and choose previous Windows version.
This procedure will show you menu on boot so you can choose what version to boot.
Sep
17
If you did not notice Microsoft released Windows 8 developer preview.
It can be freely downloaded from here.
But how to install it on the new computers without DVD ( NO CD’s available 🙁 since Win 7)?
The simplest answer is from USB key. But the question is how to “burn” DVD image to USB key?
So here is what you need:
- Computer that covers minimum system requirements – 1GHz+ CPU, 1/2GB RAM (32/64-bit versions).
- USB key (4G+) Smallest 32-bit image is 2.8G
- High speed internet – do not even think downloading via 56k modem
- You need to download appropriate version – 32 or 64 bit
- And finally you need a tool to “burn” – take it from here.
Next you need to:
- Install the tool
- Run the tool – Simply follow the wizard.
NOTE: your USB drive will be erased so make copy of your data before using it.
Warning: See my other post “Windows 8 installation and initial experience” before starting installation.
- Next step is to boot from USB key and install – this depends on your hardware 😉
2-nd NOTE: This is development preview version. Do not expect it to be stable it is not intended for end users yet. 😉
Aug
28
How to replace Windows Task manager
Filed Under Windows | Leave a Comment
In Windows world Task Manager is included in OS. It is easy to use for basic troubleshooting and to kill hanged processes.
But even the tool is powerful enough for everyday usage for further investigation or advanced use his abilities are simply not up to date.
Microsoft acquired Sysinternals a years ago and continued to develop and improve their tools. Furthermore they are freely available.
Process Explorer has much more:
- Updates a lot of system data every second
- It shows process trees and is useful of tracking DLLs
- You can investigate each process – his threads, interrupts, devices, registry keys etc.
- It is free and does not require installation
- in addition it could be easily configure to replace TaskManager.
If you are reading up to here you should be interested in the tool. Here is how to get it.
Go and download the latest version from Sysinternals website.
Unzip the downloaded file. c:\Program Files\ProcessExplorer is a good place.
Run procexp.exe and start to explore…
If you like the tool so much that you are ready to get rid of TaskManager in favor of Process Explorer simply go to Options menu and check Replace Task Manager as shown here:

Options menu Process Explorer to Replace Task Manager
Mar
27
Fix Hibernate in Windows XP part 2
Filed Under Fix, Howto, Windows | Leave a Comment
Hibernate shortcuts
As addition to Fix Hibernate in Windows XP here is additional shortcut I discovered.
To activate hibernate option I had to press <shift> every time I go to shutdown menu, but once I did not and it worked…
So here is the full shortcut:
<WinKey> -> <U> -> <H>
What that means?
– Start menu
– Shutdown
– Hibernate
Sep
26
Fix Hibernate in Windows XP
Filed Under Fix, Howto, Windows | Leave a Comment
Usually in Windows XP when you click Start -> Turn off Computer you have following options:
- Stand by
- Turn off
- Restart
But there is another option called Hibernate. As name suggests when you choose that option your computer goes in deep sleep. This is different from Stand by mode and Shutdown and actually is in between.
In that mode Windows XP does the same as Stand by, but in addition writes memory dump on the hard drive and turns off the PC.
After you power up the PC the memory dump is loaded in the memory and computer resumes operation as after stand by.
It takes a bit more time for that operation, but is much less hat initial power up.
How to enable Hibernate?
- Make sure that you are logged in with administrator account. You can do that by going in Start -> Control Panel -> User account
- Go to Power Options and choose Hibernate tab
- Check Enable hibernation
- Now you are able to hibernate your computer
Troubleshooting:
- I do not have hibernate icon
If on turn off menu you do not have hibernate icon it means that you have newer computer BIOS that supports Stand by by lower power option.
If you want to hibernate you need to press Shift button until hibernate icon appears.
Sep
10
How to disable VLC Media player system tray popup (updated for v 2.x)
Filed Under Fix, Howto, Linux, Windows | 58 Comments
Sometimes is annoying having all this popups when VLC is minimized and track changes.
Here is how to disable them (for version 1.x):
Go to Tools-> Preferences -> All -> Interfaces -> Main Interfaces -> Qt
and uncheck Notify on track change.
And since interface changed in new version (For version 2.x)
Go to Tools-> Preferences -> Interface -> Show media change popup
and change to Never
Here is a screenshot for reference:
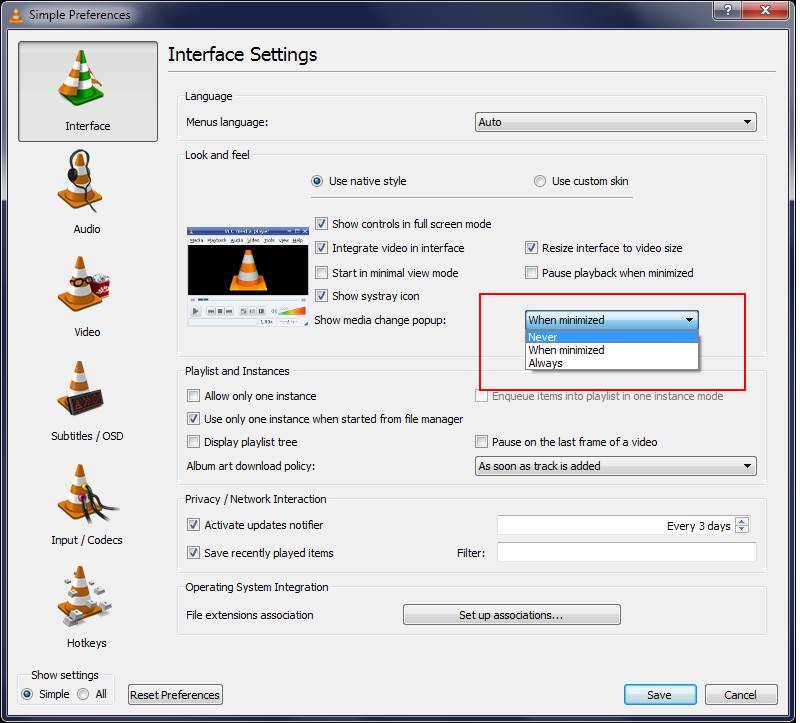
Added by request(Trevor):
If you want to remove systray icon just above there is the setting “Show Systray Icon”. Uncheck it to remove icon from systray.
Apr
12
Unit conversion in Spreadseets
Filed Under Howto, Linux, Windows | Leave a Comment
Recently I had to create a table to convert from lb to kg.
The way I did it was to start spreadsheet program – Excell or OpenOffice.org and fill up the conversion formula and desired data range.
1. In a cell fill the conversion in my case 1 lb = 0.453592 kg I used cell B1
2. Fill up a column with desired data
3. in next column type the formula =A3*$B$1
4. Copy the formula to other rows
5. Done
This method could be used for other conversions just by changeng the value in B1
Mar
28
Random name folders in Windows
Filed Under Fix, Windows | Leave a Comment
After updating my Windows machine I found that few folders with cryptic names are created in root directory.
They look like this:
28/12/2006Â 07:33 PMÂ Â Â <DIR>Â Â Â Â Â Â Â Â Â 1822a56c32dc8dbcf5 11/02/2009Â 09:42 PMÂ Â Â <DIR>Â Â Â Â Â Â Â Â Â 89b3b50a7b1b96838a89 30/08/2007Â 06:19 PMÂ Â Â <DIR>Â Â Â Â Â Â Â Â Â a8ccd1e2d466bc402f
I’m used to the folders created after update in \WINDOWS and after I’m sure that there is no problems with the update they could be safely erase, but this was something new.
After browsing the contens my initial thougths were confirmed those were temporary folders from windows update.
So I erased them…
You must be logged in to post a comment.