Aug
10
CentOS – install IPMI
Filed Under Command line, Howto, Linux | Leave a Comment
First what is IPMI?
IPMI stands for Intelligent Platform Management Interface standardized computer interface for administrators to manage computer system and monitor its operation.
It is supported by most major providers – Intel (of course), Dell, HP…
Installation
Installation is really simple:
yum install OpenIPMI OpenIPMI-tools
chkconfig ipmi on
service ipmi start
If you see error at last command check system log – it is possible that your hardware does not support IPMI.
Usage
To to see what you can do with it:
ipmitool help
man ipmitool
Enjoy:)
Jun
3
Bash: Get yesterday’s date
Filed Under Command line, Howto, Linux, Unix | 2 Comments
Recently I had to create a bash script to copy some files based on date.
The rule was copy yesterday’s files to …
But How to determine what was the yesterdays date?
The answer was in date man page.
Here are the parts from the script related to yesterday date:
$date -d '1 day ago' +'%Y/%m/%d'
2011/06/02
on Internet I’ve found also:
date --date='yesterday'
Thu Jun  2 14:01:28 EDT 2011
And (Bonus!!) if you want to go in future 😉
date --date='tomorrow'
Sat Jun  4 14:04:29 EDT 2011
Happy scripting…
Apr
1
How to crack Unix root password
Filed Under Command line, fun, Linux, Unix | 3 Comments
The root password is the key to any Unix/Linux system and the person who knows it is with full rights. But there is a simple way to crack root password.
Just type at terminal:
echo '82 43/25 43+65P80P82P73P76P32P70P79P79P76P10P' | dc
Mar
18
Make FreeBSD more “user friendly”
Filed Under Command line, Unix | Leave a Comment
In FreeBSD by default you do not have bash as shell prompt.
Here is the procedure to install it:
- type whereis bash
- cd to that folder
- type make configure
- make all install clean
- take a cofee 😉
- type chsh -s /usr/local/bin/bash root to change the shell for root or replace root with username you want to change the shell.
- Then relogin (logout and login) to enjoy bash shell
Sep
16
vim and PUTTY
Filed Under Command line, Fix, Linux, Unix | 1 Comment
Most of “ux” users and administrators use remote terminal to connect to administrared machine.
One of the popular choises, minly because of it’s portability is PuTTy only putty.exe is needed and no installation is required. In addition it is free.
Downside is that sometimes there are problems with terminal emulation – not necessary coming from putty, but still annoying.
One of my problems is that when vim is in insert mode arrow keys do not work. For long time I was no able to find solution to the problem, but finally i found one. Just type this in your home folder:
echo syntax enable > ~/.vimrc
This did the trick for me. Hope it helps to you too.
Feb
27
How to have two IPs on one interface
Filed Under Command line, Linux | 1 Comment
Recently I got into problem to assign 2 IPs on one physical NIC.
There was nothing mentioned in official documentation so I did some research and find the solution.
It is really simple if you are not afraid from command line and VI editor. Unfortunately I did not find a GUI.
Here it is:
- Go to command prompt
- Be sure that you are root. Otherwise type su – to become.
- Type – cd /etc/sysconfig/network-scripts/
- Then type ls to see the contents – you should have file ifcfg-eth0 if you have just one interface otherwise if you have multiple interfaces there you’ll find other files like ifcfg-eth1…n.
- Then we will copy the file to different name – cp ifcfg-eth0 ifcfg-eth0:0
- Next step is to edit newly created file and put the IP we needed.
- If needed repeat steps 5 and 6 with different numbers after”:” (1,2,…) to add additional addresses.
- If you issue ifconfig you will not see newly created interface, because it is no activated – you need to restart network /etc/init.d/network restart will do it for you.
- That’s it.
Comments are welcome.
Feb
22
Mass ping script
Filed Under Command line, Fix | 2 Comments
I needed to check multiple addresses for use.
I did not find any ready solution so I wrote a script.
I called it psweep.sh
Here is it(comments are welcomed):
#!/bin/bash

# Sweep ping

# 1-st arg ip 2-nd start 3-d end

#

# Written by Hristo Benev

#

# rev 0.3

#

for i in `seq $2 $3`; do

ping -c 1 -W 1 $1.$i >/dev/null 2>&1

#ping -c 1 -W 1 $1.$i

if [ $? == 0 ]; then

echo "host $1.$i is up"

else

echo "."

fi

done

# changelog

# 0.3 added progress
Jul
30
RHEL/CentOS package xxxxx missing
Filed Under Command line, Howto, Linux | Leave a Comment
Often when installing 3-d party software in RHEL/CentOS or other yum capable Linux OS there is a message of missing libraries or packages.
How to fix it?
Here is the trick.
You can use yum package manager to search for missing pieces.
yum whatprovides <package name/library>
This command will search all configured repositories for package that provides it.
Another option is to search Internet.
TIP: For better stability install only packages in official repositories. OR ones that clearly specify that they work on your OS/version.
Jul
27
Shutdown IPtables firewall
Filed Under Command line, Howto, Linux | Leave a Comment
Sometimes in troubleshooting process is necessary to turn of firewall for a short period of time.
In Linux based OS usually IPtables is used as firewall. It runs as service and could be stopped, started or restarted. In addition the status could be checked.
Here is how to do it:
Command line
When in terminal type:
/etc/init.d/iptables

Usage: /etc/init.d/iptables {start|stop|restart|condrestart|status|panic|save}
Gives you hints how to use it.
Note that to execute any of actions you need administrative privileges – either login as root, “su -” or setup sudo.
another tool that is doing the same is
service iptables <command>
If you like GUI but use command prompt you can use:
system-config-securitylevel-tui
And you will have simple interface of configuring security – firewall and selinux
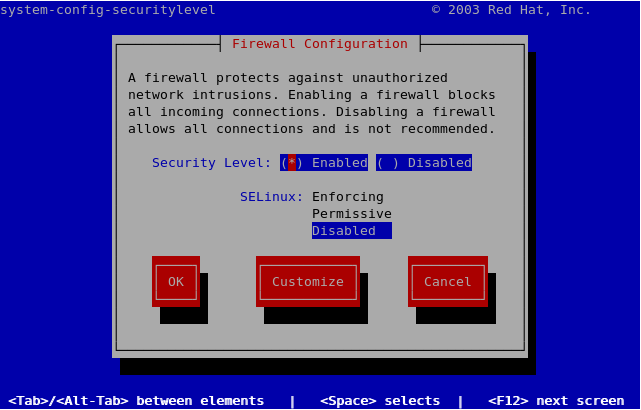
GUI based
From GUI you can use the same tool just by removing -tui or go to System–>Administration –> Security level and firewall.
Another GUI frienly way is System–>Administration –> Services where you can do the same actions as from terminal.
TIP: Do not leave your system unprotected on Internet. Use cheap SOHO firewall in front of the system until IPtables is set up.
TIP: If you are newbie in firewall configuration use some third party tools as firestarter to guide you in your setup.
NOTE: Above steps are for RHEL (CentOS) compatible systems.
Jul
16
What could be better than top –> htop
Filed Under Command line, Linux | Leave a Comment
Thanks to Ubuntu tutorials I’ve realized that my lovely tool top has now better replacement htop.
Quick comparison:
Comparison between htop and top
- In ‘htop’ you can scroll the list vertically and horizontally to see all processes and complete command lines.
- In ‘top’ you are subject to a delay for each unassigned key you press (especially annoying when multi-key escape sequences are triggered by accident).
- ‘htop’ starts faster (‘top’ seems to collect data for a while before displaying anything).
- In ‘htop’ you don’t need to type the process number to kill a process, in ‘top’ you do.
- In ‘htop’ you don’t need to type the process number or the priority value to renice a process, in ‘top’ you do.
- ‘htop’ supports mouse operation, ‘top’ doesn’t
- ‘top’ is older, hence, more used and tested.
Fortunately it is available as binary package for RHEL 5 from rpmforge so the install was quick and painless:
yum install htop
Here is how it looks:
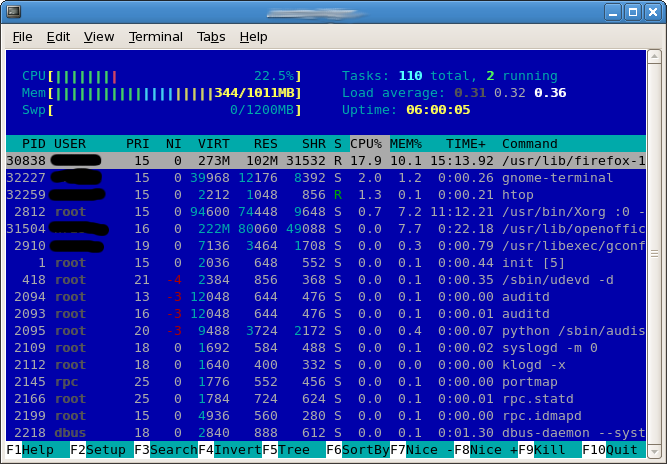
Default colors were not very appropriate for white background so I switched easily (F2-Setup->Colors) to mc colors.