Nov
25
How to edit hosts file in Windows
Filed Under Howto | Leave a Comment
hosts file is a text file used to map IP addresses to hostname before DNS was in place. So you will ask why to edit it?
Simple – sometimes is required to have map if specific host to different IP ( for example: testing ).
In general is not recommended to edit hosts file. Even some viruses are using it to map popular antivirus sites to localhost and hence deny access to them.
The file is located in %systemroot%\system32\drivers\etc\ (which for most of computers translate to C:\windows\system32\drivers\etc\)
In Windows XP and lower if you are logged as administrator you can edit the file directly, but to increase security (since most of ordinary users log as administrators) Microsoft decided to add in Windows Vista (and newer) additional layer of security so you are unable to edit the file directly.
Here is how to do it:
- In Start menu type Notepad
- Right click on Notepad and select run as Administrator
- Continue as usual – edit the file and save it
Note: Some antivirus products “protect” hosts file so you might need to disable that protection before editing.
Note: For newbies the format of the file is following:
x.x.x.x FQDN
Where x.x.x.x is IP address in numeric form
and FQDN is Fully Qualified Domain Name
Example:
127.0.0.1 localhost
Nov
23
Install telnet in Windows
Filed Under Howto | Leave a Comment
If you are using telnet to test and troubleshoot services you will be “surprised” that telnet is not installed by default.
C:\Users\>telnet

'telnet' is not recognized as an internal or external command,

operable program or batch file.
To to enable it back follow this procedure:
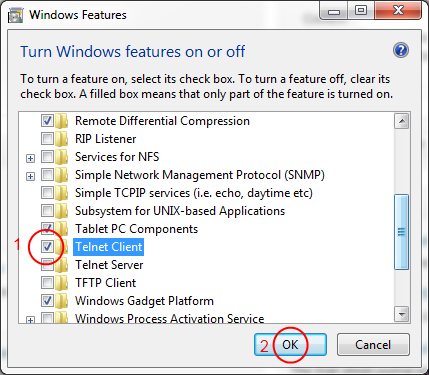
- Go to Start – > Control Panel -> Programs -> Turn Windows Features On and Off
- Check Telnet Client and click OK (See screenshot below)
- After a while it is ready
- Enjoy
Nov
10
Send e-mail with telnet
Filed Under Howto | Leave a Comment
When testing e-mail server one of the tools that are proven to be useful is plain old telnet.
Actually this is not a surprise since SMTP protocol function is similar.
Here is how to use it:
1. Start from command prompt
2. Type
telnet mailhost 25
Note: Replace mailhost with your email server.
3. Type:
HELO server.com
Note1: depending on the server HELO have to be replaced with EHLO
Note2: Replace server.com with your domain
4. Type
MAIL FROM:you@server.com
Note: Again replace you@server.com with your e-mail address
5. Type
RCPT TO: recipient@server2.com
Note: Replace recipient@server2.com with recipient e-mail address
6. Type
DATA
after that optionally
SUBJECT: Your subject
then type your message
to finish place dot at new line.
.
6. To exit type
QUIT
Oct
31
Temporary license expired
Filed Under Fix | Leave a Comment
It happens that sometimes when connecting to misconfigured Windows Terminal server (TS) client receives following error message:
“Your temporary license about to expire in… days”
This is usually dye to misconfiguration on the server side, but here is the trick to get additional 90 days temporary license:
WARNING: This requires editing of Windows registry. Use it on your own risk.
- Launch regedit – Start -> Run… -> regedit
- Go to HKLM\Software\Microsoft\MSLicensing\
- Delete hardwareID entry.
- Enjoy another 90 days, but not forget to plan for fixing the issue 🙄
Oct
6
Steve Jobs 1955-2011
Filed Under news | Comments Off on Steve Jobs 1955-2011
Sep
20
Windows 8 – First updates
Filed Under Windows | Leave a Comment
After initial installation I started to measure performance.
One really good tool for the job is windows experience index.
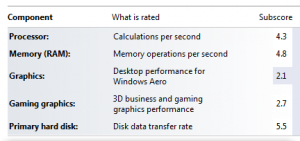
Initially my system had overall index of 2.1:
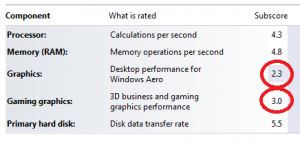
Then I checked for updates. Fortunately there were some from Microsoft. Here is the result after updates:
As you can see my index jumped to 2.3 and my graphics performance increased to from 2.7 to 3.0.
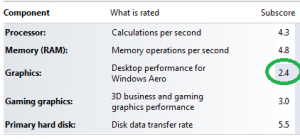
Encouraged by this I’ve installed latest video driver from NVIDIA (for Windows 7):
The results since positive My index increased to 2.4 were not so drastic, but still an improvement. Probably this is because my card is relatively old and slow or just because NVIDIA does not have(yet) drivers tuned specifically for Windows 8…
Only time will tell 😉
Stay tuned.
Sep
17
I had Windows 8 installed on my old AMD 64 with 2G RAM.
Installation went smoothly and it was really quick (did not time it, but it is faster than XP installation) with 2 reboots required.
Almost all Hardware was recognized and functional – it looks like my integrated card reader give some trouble… but will work on it.
What I had to probably start with is that the license for that system is valid until March 8, 2012 (Is it a coincidence that this is international women day 😉 ).
And most importantly you have to plan that installation really carefully.
If you need to (witch is most probably the case) keep your old OS (XP/W7) you need to:
- Create new partition for Windows 8 – this can be done with live CD like partedmagic or similar tool (windows disk management).
- Choose that partition as destination during windows 8 install – you need to choose Custom as install method.
- Continue installation
- After installed go to system properties -> advanced -> startup and recovery settings and choose previous Windows version.
This procedure will show you menu on boot so you can choose what version to boot.
Sep
17
If you did not notice Microsoft released Windows 8 developer preview.
It can be freely downloaded from here.
But how to install it on the new computers without DVD ( NO CD’s available 🙁 since Win 7)?
The simplest answer is from USB key. But the question is how to “burn” DVD image to USB key?
So here is what you need:
- Computer that covers minimum system requirements – 1GHz+ CPU, 1/2GB RAM (32/64-bit versions).
- USB key (4G+) Smallest 32-bit image is 2.8G
- High speed internet – do not even think downloading via 56k modem
- You need to download appropriate version – 32 or 64 bit
- And finally you need a tool to “burn” – take it from here.
Next you need to:
- Install the tool
- Run the tool – Simply follow the wizard.
NOTE: your USB drive will be erased so make copy of your data before using it.
Warning: See my other post “Windows 8 installation and initial experience” before starting installation.
- Next step is to boot from USB key and install – this depends on your hardware 😉
2-nd NOTE: This is development preview version. Do not expect it to be stable it is not intended for end users yet. 😉
Aug
10
CentOS – install IPMI
Filed Under Command line, Howto, Linux | Leave a Comment
First what is IPMI?
IPMI stands for Intelligent Platform Management Interface standardized computer interface for administrators to manage computer system and monitor its operation.
It is supported by most major providers – Intel (of course), Dell, HP…
Installation
Installation is really simple:
yum install OpenIPMI OpenIPMI-tools
chkconfig ipmi on
service ipmi start
If you see error at last command check system log – it is possible that your hardware does not support IPMI.
Usage
To to see what you can do with it:
ipmitool help
man ipmitool
Enjoy:)
Jun
3
Bash: Get yesterday’s date
Filed Under Command line, Howto, Linux, Unix | 2 Comments
Recently I had to create a bash script to copy some files based on date.
The rule was copy yesterday’s files to …
But How to determine what was the yesterdays date?
The answer was in date man page.
Here are the parts from the script related to yesterday date:
$date -d '1 day ago' +'%Y/%m/%d'
2011/06/02
on Internet I’ve found also:
date --date='yesterday'
Thu Jun  2 14:01:28 EDT 2011
And (Bonus!!) if you want to go in future 😉
date --date='tomorrow'
Sat Jun  4 14:04:29 EDT 2011
Happy scripting…


You must be logged in to post a comment.