Sep
10
How to disable VLC Media player system tray popup (updated for v 2.x)
Filed Under Fix, Howto, Linux, Windows | 58 Comments
Sometimes is annoying having all this popups when VLC is minimized and track changes.
Here is how to disable them (for version 1.x):
Go to Tools-> Preferences -> All -> Interfaces -> Main Interfaces -> Qt
and uncheck Notify on track change.
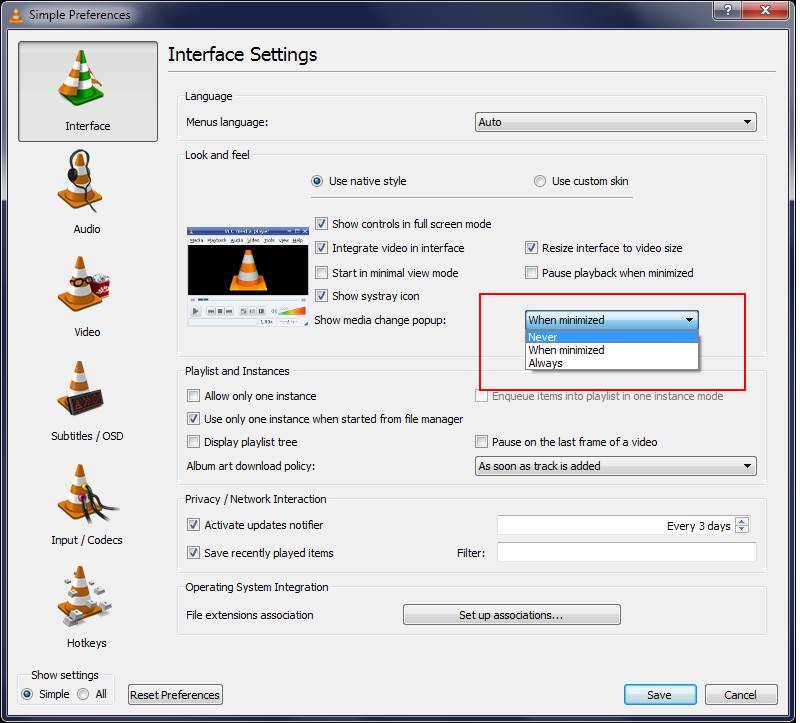
And since interface changed in new version (For version 2.x)
Go to Tools-> Preferences -> Interface -> Show media change popup
and change to Never
Here is a screenshot for reference:
Added by request(Trevor):
If you want to remove systray icon just above there is the setting “Show Systray Icon”. Uncheck it to remove icon from systray.
Aug
8
Acrobat and arrow keys (fix)
Filed Under Fix, Howto | Leave a Comment
For long time I was frustrated form inability to use arrow keys in Adobe acrobat reader to move up and down the page.
Instead of that the cursor was moving in the text.
Finally I realized that this is used to select text. And surprisingly enough I was in Select mode.
Right click and change to Hand tool and I now have the desired behavior.
Hope this will help someone.
Mar
28
Random name folders in Windows
Filed Under Fix, Windows | Leave a Comment
After updating my Windows machine I found that few folders with cryptic names are created in root directory.
They look like this:
28/12/2006Â 07:33 PMÂ Â Â <DIR>Â Â Â Â Â Â Â Â Â 1822a56c32dc8dbcf5 11/02/2009Â 09:42 PMÂ Â Â <DIR>Â Â Â Â Â Â Â Â Â 89b3b50a7b1b96838a89 30/08/2007Â 06:19 PMÂ Â Â <DIR>Â Â Â Â Â Â Â Â Â a8ccd1e2d466bc402f
I’m used to the folders created after update in \WINDOWS and after I’m sure that there is no problems with the update they could be safely erase, but this was something new.
After browsing the contens my initial thougths were confirmed those were temporary folders from windows update.
So I erased them…
Jan
28
I had a strange problem when trying to list all files i a folder.
I typed:
find . *.gz
And received:
-bash: /usr/bin/find: Argument list too long
After searching on internet I saw a lot of similar problems, but then I remembered one of my old posts
bash: /bin/rm: Argument list too long – How to fix it
After reviewing it for on more time I found my mistake
Correct syntax is:
find . -name "*.gz"
Dec
12
Fixing vim/vi arrow keys behavior
Filed Under Fix, Linux | 3 Comments
In case your arrow keys do not work as usual when you enter in “insert” mode try this:
:set nocompatible
And if this fixes the problem add:
set nocompatible
to your ~/.vimrc file.
I had this problem in FreeBSD 7.0 and this fixed it.
Found here.
Nov
27
How to repair Linux(CentOS) software RAID
Filed Under Fix, Howto, news | Leave a Comment
Sooner or later hard drives fail…
That’s why we use RAID arrays. The best solution is to use hardware RAID – one assisted with specialized processor on the board. In that category I do not include cheap (called Fake RAID) solutions integrated on the motherboard.
But unfortunately sometimes real RAID controllers are too pricey – here on help comes software RAID.
The good news is that it is included in most of the recent OS. Linux does not make an exception and the software included is really well optimized and even recommended to achieve better performance over Fake RAID.
…
Now in case of failure we are protected, but RAID 1 and 5 will protect the data in case of one drive failure so it is better to replace the failed drive as soon as possible, but on other side you do not want to stop the machine right now.
NOTE: If you have IDE HDD do not use following procedure. IDE drives are NOT HOTSWAPPABLE and removing it may cause MORE DAMAGE.
This is valid also for ordinary s-ATA and SCSI drives.
In case that you have hotswappable drive SCA or similar you can replace the drive when the machine is working.
If you are not sure check the documentation that come with your hardware.
And now after all this precautions let’s start:
Determine the failed drive
To check what array and what drive have problem simply type:
cat /proc/mdstat
Here is sample output:
md2 : active raid5 sdd2[4](F) sda2[0] sdc1[2] sdb2[1]106221312 blocks level 5, 256k chunk, algorithm 2 [4/3] [UUU_]In this case the problem is sdd.
Check drive size and type
For the size type:
fdisk -lAnd look for sdd in the output.
To check exact drive model type:
dmesg|lessand again look just before SCSI device sdd:
Next step is to obtain replacement drive
(ideally the same model)
Dump the partition table from the drive, if it is still readable:
sfdisk -d /dev/sdd > partitions.sddRemove the drive to replace from the array:
mdadm /dev/md2 -r /dev/sdd2Look up the Host, Channel, ID and Lun of the drive to replace,
by looking in
cat /proc/scsi/scsiRemove the drive from the bus
echo "scsi remove-single-device 1 0 3 0" > /proc/scsi/scsiVerify that the drive has been correctly removed
by looking in
cat /proc/scsi/scsiPhysically replace the drive
Unplug the drive from your SCA bay, and insert a new drive
Add the new drive to the bus:echo "scsi add-single-device 1 0 3 0" > /proc/scsi/scsi(this should spin up the drive as well)
Recreate the layout
Re-partition the drive using the previously dumped partition table:
sfdisk /dev/sdd < partitions.sddIf failed drive was unreadable here you need to create new partitions
Add the drive to your array
mdadm /dev/md2 -a /dev/sdd2You can check if the operation was successful by issuing
cat /proc/mdstat Inspired with modifications fromNov
21
I did not notice right away, but since version 8 of acrobat there is GPU hardware acceleration. For now only 2d and no CUDA or AVIVO, but still a step in right direction.
Unfortunately Adobe did not enable it by default so you need to do it.
Here are the steps to follow:
Start Acrobat
Go to Edit -> Preferences -> Page Display
If your video card is supported in the rendering section you will find “Use 2D GPU Acceleration”. Just check it as shown below and enjoy.
Nov
18
Upgrade HP/Compaq Presario 1950NX
Filed Under Fix, Windows | Leave a Comment
My PC is HP/Compaq Presario 1950NX and it come with integrated Video Card (Nvidia 6150) and 1G RAM.
Even it has good CPU (Athlon XP 3800) lack of memory and slow video card did not allow me to use high detail settings even on older games.
To improve the performance of the system I’ve added 1G of RAM (~$50) for total of 2G (4x512M).
And added PCI expressx16 video card from DiamondMultimedia Viper HD 2600 XT 512M (~$65).
As usual the upgrade was not flawless.
I’ve disabled the driver of NVIDIA card as noted in installation document that come with the card (always read those documents they contain important instructions) and set from BIOS PCI express as primary video controller.
After that I’ve installed the card and then the drivers from the CD.
Up to here no problems…
But after I started video player I noticed that simply there is no sound. As usual I verified the cables – so many times I simply did not plug them, but everything was OK.
Then I opened control panel -> sound and audio devices to see for my surprise that the sound card was set to none.
Next step was to check Device manager – only one adapter was listed – ATI Function Driver for High Definition Audio…
After seeing this It light up – The Video card has HDMI output and is capable to transmit audio via that connection. This was counted as sound device and since in BIOS onboard audio was set to AUTO it was disabled.
Simply setting it to Enabled bring back my sound.
Oct
24
WordPress 2.6.3
Filed Under Fix | Leave a Comment
A vulnerability in the Snoopy library was announced today. WordPress uses Snoopy to fetch the feeds shown in the Dashboard.
Even it does not seem as high risk vulnerability it is recomended to upgrade.
Oct
19
Remove GoogleUpdate.exe
Filed Under Fix, Windows | 3 Comments
After I finished my browser tests (see previous post for details) Â I started removing the browsers I do not use or the ones in beta phase.
For my “surprise” only componet that stated on my system and there was no obvious way to remove was as all of oyu already  guessed – googleupdate.exe
Even I removed the chrome browser this application was not removed and in top of it still active and connectiong to google servers for report.
After searching internet I found instructions on how to remove it.
To Uninstall GoogleUpdate.exe:
- Stop GoogleUpdate.exe in Windows Task Manager
- Run msconfig and disable GoogleUpdate.exe under StartUp (no need to restart)
- Delete GoogleUpdate task in C:\WINDOWS\Tasks
- Delete “Update†folder under your C:\Documents and Settings\Your name\Local Settings\Application Data\Google
- Clean up any term with “GoogleUpdate†in the registry file via regedit (Warning!). If you’re not sure about doing this, then just use CCleaner to clean up the registry.
Finally gone.

You must be logged in to post a comment.