Aug
20
Vista cursors in XP
Filed Under Howto, Windows | Leave a Comment
Here is a tutorial how to bring some of the Vista look into XP.
This tutorial is for mouse cursors.
Thanks Alan.
Aug
3
Disable system beep – RHEL or CentOS part II
Filed Under Fix, Howto, Linux | 3 Comments
Since a lot of people work in runlevel 3 the previous tip may not work.
So I’ve searched for other solutions found another way of disabling system beep (on tab completion).
Just edit /etc/inputrc
vi /etc/inputrc
and uncomment following line:
# do not bell on tab-completion

set bell-style none
Then after next login system beep on tab completion will be disabled system-wide.
And another one:
as root type:
rmmod pcspkr
This one will remove the module responsible for playing sound on system speaker.
Adding
blacklist pcspkr
in /etc/modprobe.d/blacklist
Should disable the module too, but it is not working for me under CentOS 5 – submitted as bug.
Another one (Hardware):
If you have PC simply open the case and unplug speaker cable from the motherboard.
NOTE: PC speaker could be very usefull when troubleshooting problems so this option is not really recommended.
OR search in your BIOS for option to disable it.
Jul
31
Install ORACLE XE on RHEL (CentOS) 5
Filed Under Howto, Linux, oracle | 6 Comments
What is that?
Oracle XE – “Oracle Database 10g Express Edition (Oracle Database XE) is an entry-level, small-footprint database based on the Oracle Database 10g Release 2 code base that’s free to develop, deploy, and distribute; fast to download; and simple to administer….”
RHEL – is Linux for enterprise environment.
CentOS – “is an Enterprise-class Linux Distribution derived from sources freely provided to the public by a prominent North American Enterprise Linux vendor.” Aiming for binary compatibility with RHEL.
After first month of releasing CentOS 5.0 one of the questions was will Oracle and RHEL continue to work together and certify their products after release of Oracle Unbreakable Linux -based on RHEL.
Recently Redhat added Oracle Database 10gR2 to their software catalog, but in the meantime Oracle released Oracle Database 11g.
Enough theory let’s start.
First you need to download Oracle XE. I prefer(and recommend) using universal edition.
Then it becomes much simpler.
Just issue(from terminal):
rpm -ivh <path to oracle rpm>
In case of missing packages see my previous post for a way to install them.
After successful installation the installer instruct you to run:
/etc/init.d/oracle-xe configure
for initial configuration. Read carefully the questions and remember system password.
Then you are ready to use XE.
Just start the browser and type:
http://localhost:8080/apex
If you are not familiar with Oracle there are step by step instructions here and here, and official documentation here.
Troubleshooting:
If you cannot access web server after successful installation check your host name it seems that oracle xe do not likes FQDN hostname. In case that you do not have DNS server enter your FQDN in local hosts file.
Credits for the tip goes to Emerson.
Jul
30
RHEL/CentOS package xxxxx missing
Filed Under Command line, Howto, Linux | Leave a Comment
Often when installing 3-d party software in RHEL/CentOS or other yum capable Linux OS there is a message of missing libraries or packages.
How to fix it?
Here is the trick.
You can use yum package manager to search for missing pieces.
yum whatprovides <package name/library>
This command will search all configured repositories for package that provides it.
Another option is to search Internet.
TIP: For better stability install only packages in official repositories. OR ones that clearly specify that they work on your OS/version.
Jul
27
Shutdown IPtables firewall
Filed Under Command line, Howto, Linux | Leave a Comment
Sometimes in troubleshooting process is necessary to turn of firewall for a short period of time.
In Linux based OS usually IPtables is used as firewall. It runs as service and could be stopped, started or restarted. In addition the status could be checked.
Here is how to do it:
Command line
When in terminal type:
/etc/init.d/iptables

Usage: /etc/init.d/iptables {start|stop|restart|condrestart|status|panic|save}
Gives you hints how to use it.
Note that to execute any of actions you need administrative privileges – either login as root, “su -” or setup sudo.
another tool that is doing the same is
service iptables <command>
If you like GUI but use command prompt you can use:
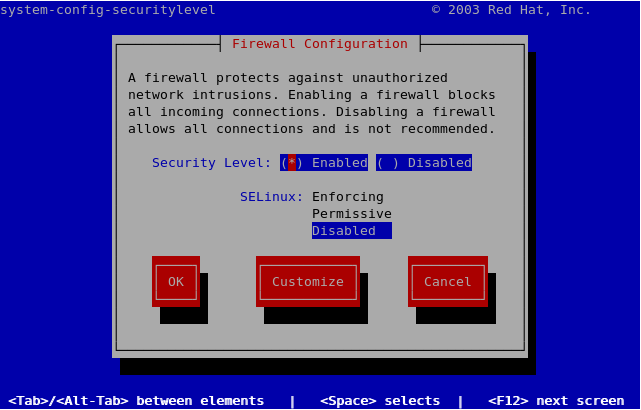
system-config-securitylevel-tui
And you will have simple interface of configuring security – firewall and selinux
GUI based
From GUI you can use the same tool just by removing -tui or go to System–>Administration –> Security level and firewall.
Another GUI frienly way is System–>Administration –> Services where you can do the same actions as from terminal.
TIP: Do not leave your system unprotected on Internet. Use cheap SOHO firewall in front of the system until IPtables is set up.
TIP: If you are newbie in firewall configuration use some third party tools as firestarter to guide you in your setup.
NOTE: Above steps are for RHEL (CentOS) compatible systems.
Jul
25
How to choose Digital Camera – Part 3
Filed Under Digital camera, Howto, Series | Leave a Comment
Manual White balance
This feature is present in most high end or “semiprofessional” cameras.
What it does?
Actually you can see it by yourself. Just take a white page and look at it in different lighting. When it is under sunlight it will appear white; Under low light it will appear gray; Under fluorescent lighting – purple … etc.
When digital camera is taking pictures all colors will be shifted and it will be really hard to obtain right colors. Manual white balance comes in help – when you use it point to something that you need to be white and camera will do the corrections for you.
In most of the cameras you have some preset values, but in real live this may not be enough.
Beginner photographs can ignore this feature.
Battery run time
One of important characteristics is how much time camera works on given set of batteries? Does it accept rechargeable batteries or already incorporates an integrated accumulator?
In later case you will need some additional information as:
- can you charge it in car or you will need to buy optional car charger? – If no you may need to consider buying DC to AC adapter.
- How much take for the accumulator to charge?
- What is the life of integrated accumulators? – usually measured in discharge/charge times
Tip: If you need to increase run time consider turning off LCD display. Of course you will need an optical viewer to see what you photograph. Unfortunately most of low cost cameras either do not have one or it “lies” – does not show correct picture area.
Attention: For some of the cameras out on the market the specifications show the time with optional high capacity accumulator and LCD turned off – read the fine-print.
Storage
One of important features is what type of storage is used into camera? What is maximum capacity? The recording speed?
Currently several technologies are used in digital cameras:
- CF – compact flash
- Micro-drive – miniature hard drive in CF format
- SD/MMC – secure digital/multimedia card
- MS – memory stick
- SM – smart media
- xD – picture card
They vary in sizes, speed and capacity and are often incompatible. So if your camera uses one you cannot put another format. Some of professional grade cameras are equipped with multiple slots supporting more than one type of card.
After determining the type you can shop for card prices and capacity. Verify camera documentation for maximum supported capacity.
Attention: Some cameras have small amount of integrated memory often impossible to expand.
Every camera has internal memory with capacity enough to store one picture and after you toke the picture the camera cannot take another one until the previous one is stored in storage media. So you need to verify the time need and how many pictures your camera can take before internal memory is filled.
To be continued
Jul
24
How to choose Digital Camera – Part 2
Filed Under Digital camera, Howto, Series | Leave a Comment
Now more about “other” specifications for a Digital Camera.
Angle of view
When photographing a group of people sometimes you need to take them closer together or step back to put all of them in a photo. This is called angle of view it depends on the ratio between the focal length and the film size.
As 35 mm cameras were professional standard, lenses are often described in terms of their “35 mm equivalent” fields of view. This is the difference between a normal lens (e.g. 50 mm), wide-angle lens (e.g. 24 mm), and telephoto lens (e.g. 500 mm). And is particularly common for digital cameras.
Mean values are 30-90mm for 3x zoom cameras.
Noise
The noise in the picture is one of most important parameters, but usually the one than is often omitted in characteristics of the camera.
Probably you’ve already seen that on some solid color areas you have dots or lines with different color just like when watching bad videotape on old VCR. This is called “noise”.
Theoretically if camera matrix is bigger there is less noise, but the size is not the only factor, the others like technology, thermal processes even electricity consumption are in play. So the best way of seeing the quality is to make test pictures. As a guide you can use camera sensitivity – usually measured in ISO. Camera with 50 ISO will be not so good as one with 800 ISO. In addition some professional cameras have noise reduction system.
Optic
The optic is one of the most important components for a camera. Low quality optic is usually seen when you take pictures with contrasting areas at the edge you could see colorful areas.
The only way to verify is to take test pictures.
Autofocus precision and speed
The precision and speed of autofocus differ from old 35mm cameras. On new digital cameras autofocus could take a second which could be crucial if you are going to take a picture of moving object, but is OK when taking static pictures. In addition autofocus could work properly when you have good lighting(such as taking picture outside), but poorly in low light (like taking picture at home).
Some cameras have low light indication and that is very useful, because in those conditions shutter is in 1/30 s and you need to keep camera steady – not a problem when light is good and shutter is 1/100 s.
to be continued…
Jul
23
Create coloring page from your photos
Filed Under Howto | Leave a Comment
How to create coloring page for your kids from photos from your archive.
This howto uses GIMP because it is freely available and do not requires that you buy more software.
For similar guide using photoshop see here.
Note: The picture for this example is taken from here.
What you will need:
- GIMP – can be downloaded for different paltforms for free.
- Initial image:

- Some creativity
- Printer
- Pencils

First install GIMP.
Then open the image
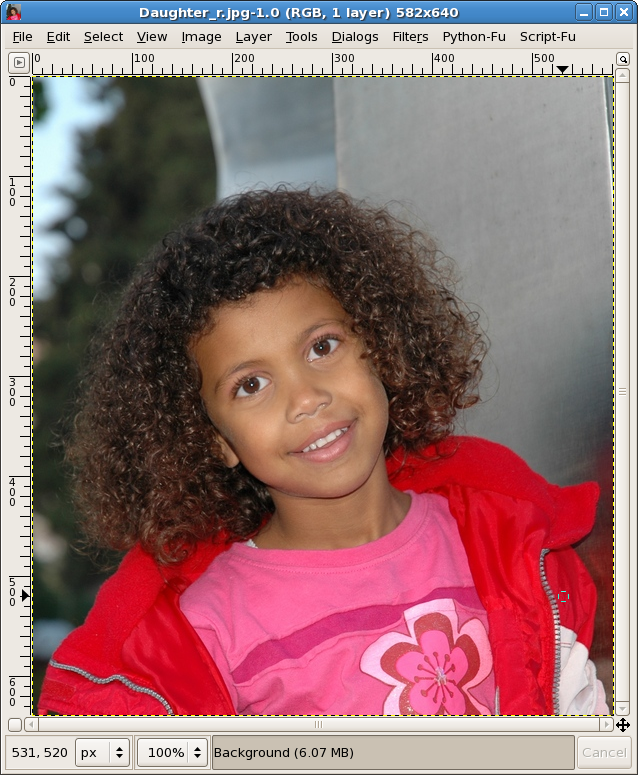
If needed adjust/crop the image.
Go to Filters–>Artistic–>Photocopy and change the paramethers until you are satisfied.
The result will look like this:
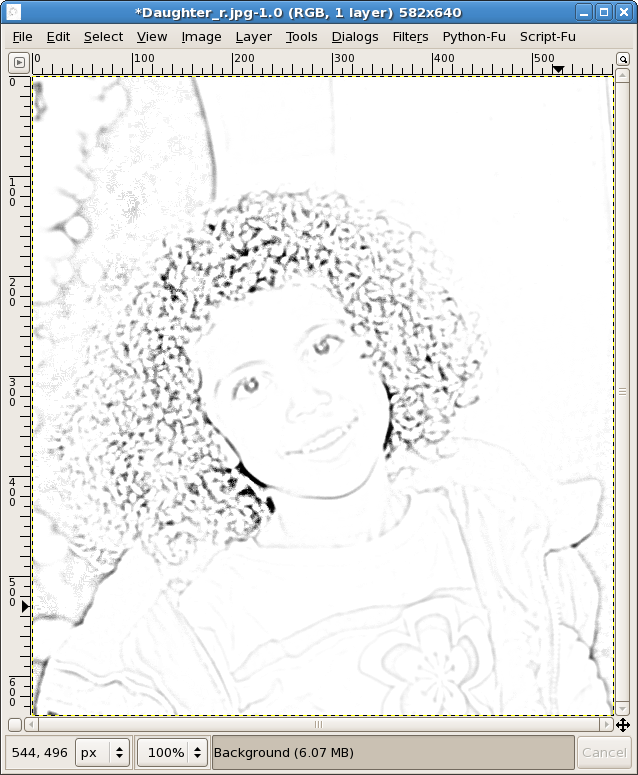
Next step will be to print the image on paper.
Finally use the creativity and pencils to color it.
Have fun….
Jul
23
How to choose Digital Camera – Part 1
Filed Under Digital camera, Howto, Series | Leave a Comment
Summer come and is time for vacation. One of the tools you will use to store those wonderful moments is Digital camera. But the question is how to choose one(in case that you still do not have one)?
This guide is not intended to replace other published guides, but to stress on “forgotten” parameters often crucial for the resulting image.
Main parameters:
- Number of matrix pixels
- Zoom
Other parameters:
- Noise
- Optics
- Auto-focus
- Manual white balance
- Storage type
- Interface type
- Time to run on batteries
- Usability
Number of matrix pixels
This is one of the most advertised part of Digital camera specifications. Image resolution and from there quality depend on it.
But what is needed matrix size? It usually depends for what the acquired image will be used. In most cases this image will be printed.
“Standard” quality printing is 300 dpi (dots per inch). Standard photo is 10×15 cm (4×6 in) from there (with simplification) we can calculate 4×300=1200 pixels and 6×300=1800 so for ordinary photo you will need image 1200×1800=2.2 Mpixels (approximately).
If we do the same calculation for 20×25 cm(8×10 in) the result is: 7.2 Mpix. And following this procedure you could calculate the needed resolution for desired resulting print size.
NOTE: Probably best will be to have spare pixels if you need to crop the image. More you have – better.
WARNING: Some Digital cameras use interpolated resolution in their specifications, so you need ro read carefully.
ATTENTION: There is no linear dependency between matrix resolution and image quality.
Zoom
Very useful function included in almost all Digital cameras allowing you to Zoom on the object without the need to change the distance between the camera and the object.
In addition this function will allow to crop from initial image everything that is not needed.
Zoom could be “optical” and “digital”.
Optical zoom is “the old school” zoom used in classical 35mm cameras. It uses optical lens to bring the object closer.
Digital zoom is not zoom in definition – instead it enlarges portion of the image using numerical algorithm or if matrix has more pixels than resulting image image is cropped(not common).
Typical numbers for digital cameras are from 3x to 10x for optical zoom and 3x-30x for digital one. Often the two are multiplied (when advertised) resulting 10x-300x zoom.
Quality wise optical zoom is much better than digital. Don’t wonder why your photos are not as sharp when using digital zoom – just use low resolution image for your desktop wallpaper and stretch it to full screen to see the results.
To be continued…
Jul
19
Versioning
Filed Under Howto, Linux, Unix, Windows | Leave a Comment
Have you already write the code and have the need to keep track of changes or keep different versions with possibility to revert easily to previous version?
Do you still have those problems?
If so the tool you may need is called subversion and is available for Linux/Unix/MAC OS X and Windows.
How to use it?
It is relatively easy especially if you create local repository:
1. You need to install the binary version or compile from source code (the procedure is described for CentOS 5, but sould not be drastically different for other OS’s except fro installation part)
yum install subversion
2. Next step is to create repository – it must be done on the machine where repository will reside
svnadmin create <path to local directory>
3. After you create repository next step is to import data
svn import <folder> <repository> -m "<log message>"
Where:
- folder – direcrtory where your data reside
- repository – file:///<path to repository> Note there are 3 slashes
- log message – something meaninfull probably something like “first import”
4. Rename the folder
mv folder folder.beforesvn
5. Create working copy of the data
svn checkout <repository> <working copy>
6. Start working and send changes to repository with
svn commit
Note that you need to be in “working copy” folder.