Oct
30
Recently I got Error ID: 30702 on my Blackberry.
Initially I suspected problem on BB side, but after researching on the web it is common problem.
Following instructions on this post I’ve tried to login to payment options, but I’ve received same error Error ID: 30702.
Following further posts I logged in in blackberry app world.
Unlike other reports my login was successful.
Then something else was wrong.
Looking at my account I’ve noticed that my e-mail address was unconfirmed. I followed instructions and confirmed my E-mail.
This allowed me to login to my app world gain.
So solution to Error ID: 30702 for me was to confirm my e-mail address.
Lesson learned 😉
Sep
14
RaspberryPi – money talks
Filed Under news | Leave a Comment
RaspberryPi is well known for it’s price. Everywhere it is mentioned that the cost is $35.
And actually really is 🙂
But there is “fineprint” too…
This is not the price at what you will receive the board?!
In addition to cost of RaspberryPi board you have to count for additional charges.
Here are the facts:
(NOTE: numbers are coming from my invoice and may vary for different cases):
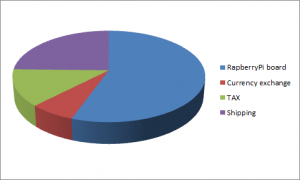
1. PaspberryPi board ($ 35 USD) (note USD part) = $37.96 CAD
Per google (On 14/9/2012) it should be $33.81 CAD
This equals to $4.15 CAD for currency exchange and rate of 1.0846
2. Tax = $7.93 CAD ( 🙂 )
3. Shipping = $15 CAD ( again 🙂 )
For total of: $60.89 CAD
So let’s do some financial analysis.
If we sum all “additional charges” they come at ~ 45% of total price.
And for the visuals representation on pie chart:
Hope this will help to make educated choice and not get caught by surprise.
Aug
24
After acquiring Skype Microsoft continues to integrate Skype with existing infrastructure.
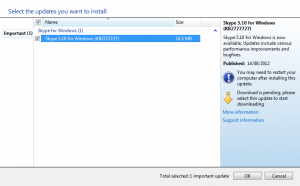
Now Skype updates are available from Microsoft update service in addition to previous Skype update (Help -> Check for updates).
What is new in version 5.10:
- Voice and video calling your Facebook friends from Skype
- Finding your Facebook contacts more easily and faster with the new contacts lists
- Tagging the contacts you talk to most often as Favorites
- Possibility to control Skype video rendering technology for backward compatibility for people who have trouble with video calls
- And of course New update method…
For more information Microsoft KB article 2727727 and Skype Blog post.
Aug
22
RaspberryPI – Unpacking
Filed Under news | Leave a Comment
After almost 2 months waiting my RaspberryPI finally is in my hands.
I’m sharing unpacking pictures:
- This is the package
- And this is what you will find inside.
- It is well packaged
- And this is the hardware
May
9
We are pleased to announce that our ZeroBin service is available for testing.
You can find the service at: HBCOM Technologies ZeroBin service.
For those who still wonder what is ZeroBin service:
“ZeroBin is a minimalist, opensource online pastebin/discussion board where the server has zero knowledge of hosted data. Data is encrypted/decrypted in the browser using 256 bits AES.”
The service is provided free of charge, please do not abuse it. Since it is still in testing mode we cannot gurantee if information will not be erase prior to expiration.
In case you find any unappropriated material posted there, please let us know.
If you need hosting we can provide you with web hosting, virtual or dedicated server. Contact us for details.
Mar
8
Probably most of you already had to log in the VMWare console to reinstall vmware tools after kernel update.
Usually we do that by simply running:
/usr/bin/vmware-config-tools.pl
After doing it few times I’ve decided to find an automated way of doing it. After quick search on Internet I found an article giving acceptable solution to my problem.
I’ll share the solution here (with two small fixes 😉 as bonus).
– Open terminal and create new file
vi /etc/init.d/vmware-check-tools
– Paste following inside:
#!/bin/bash

# Following lines auto-recompile VM Tools when kernel updated

 VMToolsCheckFile="/lib/modules/`uname -r`/misc/.vmware_installed"

 VMToolsVersion=`vmware-config-tools.pl --help 2>&1 | awk '$0 ~ /^VMware Tools [0-9]/ { print $3,$4 }'`
printf "\nCurrent VM Tools version: $VMToolsVersion\n\n"
if [[ ! -e $VMToolsCheckFile || `grep -c "$VMToolsVersion" $VMToolsCheckFile` -eq 0 ]]; then
[ -x /usr/bin/vmware-config-tools.pl ] && \
printf "Automatically compiling new build of VMware Tools\n\n" && \
/usr/bin/vmware-config-tools.pl --default && \
printf "$VMToolsVersion" > $VMToolsCheckFile && \
rmmod pcnet32
rmmod vmxnet
depmod -a
modprobe vmxnet
fi
Then make it executable:
chmod 755 /etc/init.d/vmware-check-tools
And finally create symlink:
cd /etc/rc.d/rc3.d

ln -s ../init.d/vmware-check-tools S09vmware-check-tools
Mar
6
Upgrade Shorewall from 4.4.x to 4.5.x
Filed Under Linux | Leave a Comment
Recently Shorewall (Shoreline Firewall) released new version 4.5.0.
This version introduced new packing. From this version you have follwoing packages:
- Shorewall Core – Core libraries installed in /usr/share/shorewall/
- Shorewall – Requires Shorewall Core. Together with Shorewall Core, provides IPv4 firewalling.
- Shorewall6 – Requires Shorewall. Provides IPv6 firewalling.
- Shorewall Lite – Requires Shorewall Core. As before.
- Shorewall6 Lite – Requires Shorewall Core. As before.
- Shorewall Init – As before.
Since we have Core package now to upgrade from 4.4.x version you need to update at least 2 packages – core and shorewall.
To do that in CentOS 5 the spteps are follwoing (in your case probably versions will be different):
1. Download new packages
wget http://www.invoca.ch/pub/packages/shorewall/RPMS/ils-5/noarch/shorewall-4.5.0.2-1.el5.noarch.rpm http://www.invoca.ch/pub/packages/shorewall/RPMS/ils-5/noarch/shorewall-core-4.5.0.2-1.el5.noarch.rpm.
2. Upgrade shorewall
rpm -Uvh shorewall-core-4.5.0.2-1.el5.noarch.rpm shorewall-4.5.0.2-1.el5.noarch.rpm

error: Failed dependencies:

perl(Digest::SHA1) is needed by shorewall-4.5.0.2-1.el5.noarch
In my case additional package was required so I have to install it:
yum install perl-Digest-SHA1
and update again
3. Check configuration
shorewall check
4. Restart shorewall
shorewall restart
Feb
20
Debian – packages being kept back
Filed Under Fix | Leave a Comment
To upgrade you Debian installation usually you use:
apt-get update
apt-get upgrade
This should upgrade all installed packages. But sometimes there is a message that some packages are kept back. This means that dependencies have changed on one of the packages you have installed so that a newer package must be installed to upgrade.
To fix this you must execute:
apt-get dist-upgrade
This will do the trick.
Nov
29
Robots.txt tips and tricks
Filed Under Howto | 8 Comments
robots.txt is a file that you can use to instruct where web crawlers should look for information and where they should not.
How it works?
Good web crawler first accesses root of a domain and looks for robots.txt file.
For example if robot wants to check www.example.com/welcome.html it will first check if www.example.com/robots.txt exists.
And again for example it finds:
robots.txt:
# No robots, Please

User-agent: *

Disallow: /
In above file:
User-agent: * means this section applies to all robots and
Disallow: / instructs the robot that it should not visit any pages on the site.
Note: It is important to know that robots can ignore your /robots.txt and robots.txt file is a publicly available file.
First consideration is really important to know since the robots who ignore the instructions are usually malicious.
What to put inside?
robots.txt is a plain text file. Here are few examples:
To allow all robots to visit all files:
User-agent: *

Disallow:
And opposite disallow all robots out:
User-agent: *

Disallow: /
If you need to disallow a specific agent to visit specific folder
User-agent: SpecificBot # replace the 'SpecificBot' with the actual user-agent of the bot

Disallow: /notimportant/
Above example shows also how you can put comments in the file.
In addition you can tell robots where your sitemap is located
User-agent: *

Sitemap: http://www.example.com/sitemaps/sitemap.xml
Where to put it?
The short answer: in the top-level directory of your web server.
A bit longer: it should be located after your domain name. For example www.example.com/robots.txt not www.example.com/robot_file/robots.txt
Nov
28
If you just got your new CentOS server.
After a while you notice that timestamps in your logfiles are shifted with few hours. So what could be wrong?
Actually is really simple – most probably your timezone is not correct. To check run “date” from command line, this will show what is the time for your server.
Then you find that the timezone is not correct?!
How do you set the correct one?
Unfortunately, this is not an easy thing to figure out. Official documentation states that you can use system-config-date, but it has a bunch of dependencies (when I ran yum install system-config-date on one of my servers it asked to install 84 packages).
So is there an alternative way to do it?
All timezone files are located in /usr/share/zoneinfo. To select the appropriate named timezone for your location. For my location, Montreal, Canada, I actually have to select: America/Montreal. For you it could be different so make note of the appropriate folder and file for your timezone.
The active timezone used on your system is in the /etc/localtime file.
The default will vary depending on your server host and it depends on the value that was provided during installation.
We simply need to replace this file with the file we selected in the previous step.
Even I say replace, actually is recommended to create a link to the pertinent file rather than actually replacing the file.
Here are the steps to follow:
First, backup the existing localtime file (it is always good practice to make backups of original config files).
mv /etc/localtime /etc/localtime.bak
Next, create the link:
ln -s /usr/share/zoneinfo/ /etc/localtime
Test your change.
Run “date” from the command line, and ensure that the appropriate time, date, and timezone are reported.


You must be logged in to post a comment.