Jul
23
How to choose Digital Camera – Part 1
Filed Under Digital camera, Howto, Series | Leave a Comment
Summer come and is time for vacation. One of the tools you will use to store those wonderful moments is Digital camera. But the question is how to choose one(in case that you still do not have one)?
This guide is not intended to replace other published guides, but to stress on “forgotten” parameters often crucial for the resulting image.
Main parameters:
- Number of matrix pixels
- Zoom
Other parameters:
- Noise
- Optics
- Auto-focus
- Manual white balance
- Storage type
- Interface type
- Time to run on batteries
- Usability
Number of matrix pixels
This is one of the most advertised part of Digital camera specifications. Image resolution and from there quality depend on it.
But what is needed matrix size? It usually depends for what the acquired image will be used. In most cases this image will be printed.
“Standard” quality printing is 300 dpi (dots per inch). Standard photo is 10×15 cm (4×6 in) from there (with simplification) we can calculate 4×300=1200 pixels and 6×300=1800 so for ordinary photo you will need image 1200×1800=2.2 Mpixels (approximately).
If we do the same calculation for 20×25 cm(8×10 in) the result is: 7.2 Mpix. And following this procedure you could calculate the needed resolution for desired resulting print size.
NOTE: Probably best will be to have spare pixels if you need to crop the image. More you have – better.
WARNING: Some Digital cameras use interpolated resolution in their specifications, so you need ro read carefully.
ATTENTION: There is no linear dependency between matrix resolution and image quality.
Zoom
Very useful function included in almost all Digital cameras allowing you to Zoom on the object without the need to change the distance between the camera and the object.
In addition this function will allow to crop from initial image everything that is not needed.
Zoom could be “optical” and “digital”.
Optical zoom is “the old school” zoom used in classical 35mm cameras. It uses optical lens to bring the object closer.
Digital zoom is not zoom in definition – instead it enlarges portion of the image using numerical algorithm or if matrix has more pixels than resulting image image is cropped(not common).
Typical numbers for digital cameras are from 3x to 10x for optical zoom and 3x-30x for digital one. Often the two are multiplied (when advertised) resulting 10x-300x zoom.
Quality wise optical zoom is much better than digital. Don’t wonder why your photos are not as sharp when using digital zoom – just use low resolution image for your desktop wallpaper and stretch it to full screen to see the results.
To be continued…
Jul
23
Is it possible to crash Vista
Filed Under error, Windows | Leave a Comment
After the hype of security in marketing campaign run by Microsoft about new security “pearl” Vista, there are the first reports of how easily someone can crash the system….
Just press Win+E – this is well known shortcut for launching Explorer and hold it for 20 sec this will cause the launch of multiple Windows Explorer instances resulting lack of system resources and crash of the system.
Unfortunately this cannot be stopped in Task manager….
Wait for patch for MS and hope that somebody will not write a hoax using this vulnerability.
Jul
19
Versioning
Filed Under Howto, Linux, Unix, Windows | Leave a Comment
Have you already write the code and have the need to keep track of changes or keep different versions with possibility to revert easily to previous version?
Do you still have those problems?
If so the tool you may need is called subversion and is available for Linux/Unix/MAC OS X and Windows.
How to use it?
It is relatively easy especially if you create local repository:
1. You need to install the binary version or compile from source code (the procedure is described for CentOS 5, but sould not be drastically different for other OS’s except fro installation part)
yum install subversion
2. Next step is to create repository – it must be done on the machine where repository will reside
svnadmin create <path to local directory>
3. After you create repository next step is to import data
svn import <folder> <repository> -m "<log message>"
Where:
- folder – direcrtory where your data reside
- repository – file:///<path to repository> Note there are 3 slashes
- log message – something meaninfull probably something like “first import”
4. Rename the folder
mv folder folder.beforesvn
5. Create working copy of the data
svn checkout <repository> <working copy>
6. Start working and send changes to repository with
svn commit
Note that you need to be in “working copy” folder.
Jul
18
This revision is mainly security update – fixed eight security issues three of them critical.
Note: If you have previous version just go to Help–>Check for updates
Jul
17
How to disable system beep in RHEL (CentOS) 5
Filed Under Howto, Linux | 8 Comments
CentOS 5(probably RHEL too) comes with system beep enabled by default.
This could be very irritating because the sound comes from system speaker and cannot be disabled with sound controls.
Solution:
go to system–>preferences—>sound—>system beep and uncheck it.

Now you will have system beep only at login.
Jul
16
What could be better than top –> htop
Filed Under Command line, Linux | Leave a Comment
Thanks to Ubuntu tutorials I’ve realized that my lovely tool top has now better replacement htop.
Quick comparison:
Comparison between htop and top
- In ‘htop’ you can scroll the list vertically and horizontally to see all processes and complete command lines.
- In ‘top’ you are subject to a delay for each unassigned key you press (especially annoying when multi-key escape sequences are triggered by accident).
- ‘htop’ starts faster (‘top’ seems to collect data for a while before displaying anything).
- In ‘htop’ you don’t need to type the process number to kill a process, in ‘top’ you do.
- In ‘htop’ you don’t need to type the process number or the priority value to renice a process, in ‘top’ you do.
- ‘htop’ supports mouse operation, ‘top’ doesn’t
- ‘top’ is older, hence, more used and tested.
Fortunately it is available as binary package for RHEL 5 from rpmforge so the install was quick and painless:
yum install htop
Here is how it looks:
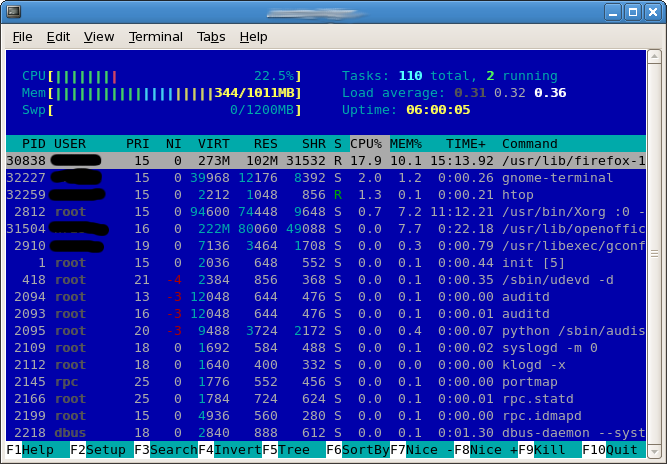
Default colors were not very appropriate for white background so I switched easily (F2-Setup->Colors) to mc colors.
Jul
14
CUPS code is now owned by APPLE
Filed Under Linux, news | Leave a Comment
According to following source.
Apple now owns the CODE of CUPS.
I hope that this is for good.
Jul
13
Searching for file listings
Filed Under google | Leave a Comment
To find file on the web type following in Google:
intitle:”index.of” (mp3,mp4,avi) <text to search> -html -htm -php
Seen on dl.tv
Jul
13
How to unlock yourself – Linux screensaver
Filed Under Command line, Fix, Howto, Linux | Leave a Comment
Today I’ve accidentally locked myself with Linux screensaver.
How this happened?
I use English letters for my password, but when I’ve stepped back from my Linux workstation my keyboard group was with group different than English.
As result when I come back and tried to unlock myself I couldn’t enter the correct password.
Solutions:
1. First and simplest solution will be to kill X with Crtl+Alt+Backspace
2. Reboot the PC – Alt+Ctrl+Del
3. Try to fix it
Because I’ve had open and unsaved documents first 2 options will result loss of my work I’ve decided to go with third one.
How I did it:
A requirement is to have another PC and ssh access to main one.
1. Login via ssh to locked PC.
2. Start vnc server under your account
vncserver
Note you will need vnc server installed. How to do it is out of the scope – consult your documentation.
3. Open firewall ports required for VNC or simply shutdown firewall
/etc/init.d/iptables stop
4. On other PC start VNC client and connect to locked one
5. Start keyboard configuration
gnome-keyboard-properties
6. Remove all other layouts except English
7. Now you can return to locked PC and unlock it.
NOTE: This procedure was tested on LAN and CentOS 5.
Jul
13
Default password list
Filed Under Howto | Leave a Comment
Every SysAdmin needs somethimes to access to equipment who’s documentation is missing.
Then the Default password list is the source to find your default pasword.
I’ve made local copy just in case.
Default password list 03.07.2007