Apr
25
From several years my home router is Asus WL-520GC. Even manufacturer firmware is good enough for everyday users I did flash the router with DD-WRT firmware. How to do that is well explained in the dd-wrt wiki.
After upgrading my Internet connection speed I’ve noticed that I can reach maximum speed only from wired network and WiFi is maxed at 6Mbs and ping is with 5ms more than wired connection.
Ping increase looks logical since packets are encrypted and traveling over air. What puzzled me was the decrease in speed.
Initially I suspected my laptop (C-60 CPU is not most powerful one), but test results were the same from much more powerful PC.
Next step was to update all Windows drivers – unfortunately without noticeable result. As riding on update wave it was logical to upgrade also dd-wrt firmware from 13084 to latest recommended 14896 (at moment of writing this post). Main reason for that was multiple forum posts that build 13084 had problems. Unfortunately subsequent tests did not show increase in WiFi speed.
So back to reading and testing. Several forum posts suggested changing WiFi advanced setting. To cut long story short here are settings I did have success with:
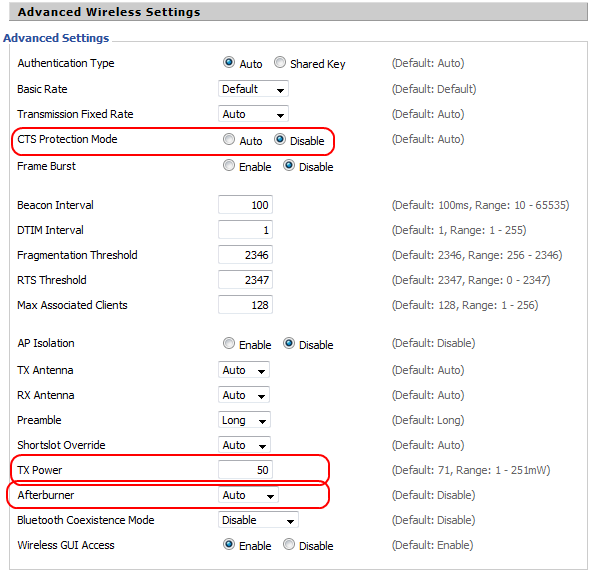
DD-WRT Advanced Wireless Settings
CTS Protection Mode – > Disable
TX power -> 50
Afterburner -> Auto
In addition I did basic WiFi survey to determine how channels were used in my area and set least used one.
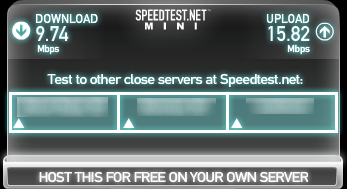
Here is the result:
If you have comments or suggestions on how to improve the speed even more, please share in the comments.
May
7
Upgrade to Debian 7.0 (Squeeze To Wheezy)
Filed Under Howto | Leave a Comment
New Debian (Wheezy) has just been released. Here you will find how to update quickly.
This post is an update of Debian – upgrade to Squeeze.
Notice: Before you start the upgrade – upgrade your current system and backup your data
Here is the process:
1. Edit sources.list
vi /etc/apt/sources.list>
2. Replace distribution name (Squeeze) with Wheezy.
(press : and type)
%s/squeeze/wheezy/g
Then you execute the upgrade in two easy steps.
apt-get update
apt-get dist-upgrade
Then to finalize the upgrade:
reboot
Mar
25
Adding few DNS records from GUI is a breeze, but when you have more than one some automation will help.
Windows provides command line tools to help you with that.
But the trick is that you have to get your hands “dirty” and type some commands in bat file.
In this case I’m using dnscmd tool (from Windows Support Tools).
If you are unsure how to install it check Install Windows Support Tools tutorial from Microsoft
Here is dns.bat:
@echo off
set dnshost=localhost
set domain=
echo “We are reading records from records.txt”
for /F “tokens=1,2,3 delims=,” %%G in (records.txt) do dnscmd %dnshost% /RecordAdd %domain% %%G %%H %%I
It reads records from records.txt formatted in following way:
<hostname>,<record type>,<IP>
First record is hostname (without domain) followed by record type (A, PTR…) and last ip addres
NOTE: there is comma separating all values
How to use it:
1. Put your records in records.txt
2. type dns.bat
3. That it is… (Probably good time to validate 🙂 )
Mar
17
Since version 19 Mozilla Firefox comes with build in PDF viewer.
Generally it does the work and it is really useful when no another PDF reader is installed, but in some cases is not so appropriate and you might be better with external viewer.
Problem I have is that it is Java Script based and even JS is really fast on low power machines it is not as fast as “real” plugin.
In case you need to disable build in viewer do following:
- Open Firefox Options
- Go to Applications
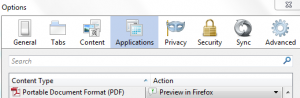
- Find PDF in the list and change the action from Preview in Firefox to appropriate one.

That is all…
Feb
19
To control the daemons that are started at boot in Debian simply use following commands.
To enable a daemon:
update-rc.d <daemon> enable
To disable daemon:
update-rc.d <daemon> disable
NOTE: In above examples <daemon> is the name of the daemon listed in /etc/init.d/
Jan
21
How to restore HTTP to address bar
Filed Under Howto | Leave a Comment
Mozilla constantly improves Firefox. Some improvements are good, but some questionable or it is just personal preference.
One of the things developers changed in recent versions is the way website URL is displayed in address bar.
Now it looks like this:
as you can see http:// protocol in front of URL is hidden
But I prefer to be shown like that
Now I know that I’m visiting http site 😉
From one side it leaves only web address and it is less crowded, but if you feel uncomfortable without http just follow these steps:
- Type in Firefox address bar about:config
- Filter to browser.urlbar.trimURLs (just copy/paste in Filter field)
- Double click on result listing or choose toggle from context menu. Value should be set to false – this disables URL trimming.
- That is it – now you have http:// if front of your URL.
- If you prefer to go back to default value just repeat the procedure and be sure that value is true.
- This will re enable URL trimming.
Nov
1
Google Chrome offline installer
Filed Under Howto | Leave a Comment
Google Chrome is excellent browser. And probably most of you have it installed.
Only drawback I’ve noticed is that installation is online. This is generally not a problem, but what to do if the target system does not have internet connection?
The answer is not obvious and required some research. I was not able to find direct link on Google Chrome download page 🙁
Quick search on the web returned this Google Help Page.
Using Alternate installer for all user accounts link I was able to get the package and install it.
This package will help if you deploy Chrome on wider base (Windows GPO for example).
Unfortunately if target system does not have Internet access you have to revisit this page often to download new release.
Mar
8
Probably most of you already had to log in the VMWare console to reinstall vmware tools after kernel update.
Usually we do that by simply running:
/usr/bin/vmware-config-tools.pl
After doing it few times I’ve decided to find an automated way of doing it. After quick search on Internet I found an article giving acceptable solution to my problem.
I’ll share the solution here (with two small fixes 😉 as bonus).
– Open terminal and create new file
vi /etc/init.d/vmware-check-tools
– Paste following inside:
#!/bin/bash

# Following lines auto-recompile VM Tools when kernel updated

 VMToolsCheckFile="/lib/modules/`uname -r`/misc/.vmware_installed"

 VMToolsVersion=`vmware-config-tools.pl --help 2>&1 | awk '$0 ~ /^VMware Tools [0-9]/ { print $3,$4 }'`
printf "\nCurrent VM Tools version: $VMToolsVersion\n\n"
if [[ ! -e $VMToolsCheckFile || `grep -c "$VMToolsVersion" $VMToolsCheckFile` -eq 0 ]]; then
[ -x /usr/bin/vmware-config-tools.pl ] && \
printf "Automatically compiling new build of VMware Tools\n\n" && \
/usr/bin/vmware-config-tools.pl --default && \
printf "$VMToolsVersion" > $VMToolsCheckFile && \
rmmod pcnet32
rmmod vmxnet
depmod -a
modprobe vmxnet
fi
Then make it executable:
chmod 755 /etc/init.d/vmware-check-tools
And finally create symlink:
cd /etc/rc.d/rc3.d

ln -s ../init.d/vmware-check-tools S09vmware-check-tools
Nov
29
Robots.txt tips and tricks
Filed Under Howto | 8 Comments
robots.txt is a file that you can use to instruct where web crawlers should look for information and where they should not.
How it works?
Good web crawler first accesses root of a domain and looks for robots.txt file.
For example if robot wants to check www.example.com/welcome.html it will first check if www.example.com/robots.txt exists.
And again for example it finds:
robots.txt:
# No robots, Please

User-agent: *

Disallow: /
In above file:
User-agent: * means this section applies to all robots and
Disallow: / instructs the robot that it should not visit any pages on the site.
Note: It is important to know that robots can ignore your /robots.txt and robots.txt file is a publicly available file.
First consideration is really important to know since the robots who ignore the instructions are usually malicious.
What to put inside?
robots.txt is a plain text file. Here are few examples:
To allow all robots to visit all files:
User-agent: *

Disallow:
And opposite disallow all robots out:
User-agent: *

Disallow: /
If you need to disallow a specific agent to visit specific folder
User-agent: SpecificBot # replace the 'SpecificBot' with the actual user-agent of the bot

Disallow: /notimportant/
Above example shows also how you can put comments in the file.
In addition you can tell robots where your sitemap is located
User-agent: *

Sitemap: http://www.example.com/sitemaps/sitemap.xml
Where to put it?
The short answer: in the top-level directory of your web server.
A bit longer: it should be located after your domain name. For example www.example.com/robots.txt not www.example.com/robot_file/robots.txt
Nov
25
How to edit hosts file in Windows
Filed Under Howto | Leave a Comment
hosts file is a text file used to map IP addresses to hostname before DNS was in place. So you will ask why to edit it?
Simple – sometimes is required to have map if specific host to different IP ( for example: testing ).
In general is not recommended to edit hosts file. Even some viruses are using it to map popular antivirus sites to localhost and hence deny access to them.
The file is located in %systemroot%\system32\drivers\etc\ (which for most of computers translate to C:\windows\system32\drivers\etc\)
In Windows XP and lower if you are logged as administrator you can edit the file directly, but to increase security (since most of ordinary users log as administrators) Microsoft decided to add in Windows Vista (and newer) additional layer of security so you are unable to edit the file directly.
Here is how to do it:
- In Start menu type Notepad
- Right click on Notepad and select run as Administrator
- Continue as usual – edit the file and save it
Note: Some antivirus products “protect” hosts file so you might need to disable that protection before editing.
Note: For newbies the format of the file is following:
x.x.x.x FQDN
Where x.x.x.x is IP address in numeric form
and FQDN is Fully Qualified Domain Name
Example:
127.0.0.1 localhost
You must be logged in to post a comment.